Sunday, March 18, 2012

Making People Happy One Cake Pop At A Time!


I've never seen happier faces than when people see cake pops! What is it about these little rounds balls of cake, frosting, and chocolate that do this to people? Seriously, these little suckers can really turn a frown upside down! Especially, my children! My 19 month old daughter is talking a lot these days, and I'm not sure that I love that she knows the word "Pop" as it refers to pure sugar! And if my 3 1/2 year old could eat these for breakfast, lunch, and dinner, she would. She's already putting in her request for her birthday in June! But how can I say "No" to them! I know just how devine they are!

In the last three months I've made four batches for different occasions.Two batches of Elmo heads for 2-year old birthday boy parties. These are the funniest of all! I learned how to make them from Bakerella, the queen of cake pops!

                          Here's a set she made of the Sesame Street crew for their anniversary.

These little guys bring so many smiles, not just because they are so darn cute, but who doesn't love that fuzzy little red puppet? And two, they're delish!

Here are the basic instructions from Bakerella with a little tweaking from myself.
Supplies for the basic cake pop: 1 box cake mix (cook as directed on box for 13 X 9 cake)
1 can frosting (16 oz.) ( I use 3/4 of a can)
Wax paper Color candy melts (color is your choice) (1 lb. pkg.)
Lollipop sticks (or a thicker tan stick with a spear at the end - these work well when using styrofoam - my sister in-law turned me on to them) you can find these in Michaels.

Directions: After cake is cooked and cooled completely, crumble into large bowl.
Mix thoroughly with 1 can frosting. (I use the back of a large spoon, but it may be easier to use fingers to mix together. ( I mix with hands) But, be warned, it will get messy.
Also, you may not need the entire can of frosting, so start out by using almost the entire can and add more if you need to.)
Roll mixture into quarter size balls and place on wax paper covered cookie sheet. (Should make 45-50) Melt chocolate in the microwave per directions on package. (30 sec intervals, stirring in between.)
Dip the tip of your lollipop stick in a little of the melted candy coating and insert into the cake balls. (Insert a little less than halfway.) Place them in the freezer for a little while to firm up.
Once firm, carefully insert the cake ball into the candy coating by holding the lollipop stick and rotating until covered.
Once covered remove and softly tap and rotate until the excess chocolate falls off. Don’t tap too hard or the cake ball will fall off, too.
Place in a styrofoam block to dry.

Here are my Elmo pops!


Look at these lovely little ladies! There's something really delicious about white chocolate too! I admit, I ate my fare amount of those white chocolate melts before they were melted! I brought these for favors to a Welcome Baby Brunch for my friend, Jamie, who just had a baby. They were a hit! Everyone asks that question, "How did you make them?" They arent' that hard, but they are very time consuming. Especially those Elmo heads. But it's really fun!

                                                                                                                          
                                                                  Before Decorating
 I decided to melt some pink chocolate and drizzle it over the plain white pops.  In order to do this, take a ziploc sandwich bag and place it inside of a glass and fold over the glass.  Then put some melted chocolate inside.  
                                      

Remove the bag from the glass, twist the top closed or put a rubber band around it.  Then cut the tip of the bag, and begin drizzling the pops.  There is no science to drizzling, just move your hand around. 

                                        Get creative and draw out the guest of honor's names on the pops too!  
                                                       This is what you do with your leftover chocolate! 
If you're using these as party favors, you'll want to wrap them in celephane and add a twist tie or a ribbon, or string.  You can find the right size bags at Michaels.  You can add "Thank You" party tags, like these.        

                                  Here are the printables that I made - use them for your pops!


Eat and enjoy!!!


Pin It

Saturday, March 17, 2012

White Ruffled Curtains - The Perfect Curtain For a Nursery

Okay, things have been crazy busy, but I'm still working away, just not posting away. Blogging is more time consuming than you think. Especially when projects with photos are involved. But I've been up to a lot that I really want to share. A couple of weeks ago I made white ruffled curtains for a friend's nursery. I went to visit her a couple of weeks after she had her baby.  While visting, she showed me the nursery.  She had a big beautiful window in there and she told me she was looking at white ruffled curtains from Pottery Barn Kids.

                                                                 Pottery Barn Curtains
                                                               
She said that she didn't want to spend what they were selling them for.  They were $84 a panel and she needed two.  So, I said, "I'll make them for you!!!" I had never done it before, but I knew that I could.  So why not give it a shot?  Because I just don't have enough going on in my life, right? This just gave me the opportunity to learn something new, plus these were going to be a gift for the baby anyway.

I immediately began looking around at my options. I looked online for others that had made them and could give me some pointers. I quickly realized that to make the exact curtains that she wanted could be a lot more work than I wanted to do. So, I found these and ran them by my friend to see if she liked them as well. I thought these were a perfect compromise between the two.
She liked them, so I got to work! I decided to check out my trusty old friend, IKEA, first. I had purchased some great white ruffled ones from them years ago, and I thought they might have something similar. They didn't! But they did have white panels that would work. And they came two per pack, so I bought two packs. I decided I would use two panels as my base, and the others to make my ruffles! What a genius, right? It's like that Food Network show, "Semi-Home Cooked". They're semi-home made curtains! I'm not that dumb! I do know how to make life a little easier when I can.

A few things varied from the curtains I wanted to make and the ones that were already made. The width was much smaller on the ones that I wanted to make then the panels from IKEA. I considered making them a little smaller to match the others, but I thought it'd be too much extra work to do that, so I just left them the width they were.

You can make your ruffles any width you prefer but mine were about 7 inches or so.  And in order to cover your base, you'll need them to be double the width of the base curtain.  So, I laid my extra curtain out on the floor and used the length of the curtain to make my ruffles. Then I made a cut at the top every 7 inches.   Then I just began ripping them instead of cutting the strips.  Believe it or not, it's faster and much more accurate then cutting!
I made 4 ruffles per curtain.  So, after you've ripped your 8 strips of fabric, you'll want to hem the side that will be showing.  The side that will be sewn to the base doesn't need hemming.  However, you will need the top ruffle to be hemmed on both sides because you don't want an unfinished edge showing.
There are two ways you can do this part to make the ruffle.  You can set your sewing machine on your largest stich setting and sew all the way across your strip.  Then leave some extra thread so that you can pull it, which will cause it to ruffle.  For some reason this never works right for me.  Therefore, I just make basting stiches instead.  These are large stitches that you run through the top and then pull the thread to make the ruffle.  It's the same concept as using your machine but you have a larger stich. 

Once you've got your ruffle, pin your ruffle at the edge of each side of the curtain first, and then adjust your ruffles accordingly.  Once your ruffle is where you want it, pin the heck out of it to the base.   Use a lot of pins here.  I had to redo the first couple of ruffles that I did because I didn't realize that by doing this it would keep my ruffle straight while sewing it to the base. 
Then get busy sewing those suckers down.  You'll just over lap the bottom of each ruffle to cover the top of the previous ruffle.  This part wasn't easy.  But you can do it!  I promise.  It's time consuming, but you can do it!  I promise.  And when you've had enough, take a break!  Eventually, you'll want to just get it done, so you will.  It's really like The Little Engine That Could type of project!  You think you can, so you do! 

                                                                    See you can do it!!!
After I added all the ruffles, I hung one in my bedroom to see how they would look.  The height wasn't the same as the height of her window, and so the bottom ruffle is laying on the floor, but this gave me a good idea of what they'd look like. 
                                                                          And...
...here they are hung in the baby's room!  I had my friend take photos for me, and this is what she sent!  How cute.  And Baby Savannah's, big sister, Emma, adds just the perfect touch to the curtains!
 
Pin It

Monday, February 20, 2012

That lovely little corner of the room - organizing it all

In my home, I have several office areas.  One that is a built in from the builder and it's upstairs.  One, we call "The Cave" which serves as office, guestroom, craftroom, and man room (this is more like a mom room because I use it a lot more than my husband).  It's the place that I feel like things get done!  The problem is that we have a corner in our kitchen, as I'm sure you do too, that just accumulates a ton of crap!  It collects bills that need to be paid, papers that need to be filed, invitations to weddings, baby showers, and Christmas cards.  It collects cameras, books, keys, wallet, phone and my "To Do" lists.  It collects things that my kids take from other places of our home and end up here with hopes that someday they'll make it back to their beloved homes somewhere in the house!  I hate this corner.  Just looking at it gives me an ulcer. But for some reason I think it gets used because it's just that little place in our home that we need to rely on.  You get me!  I know you do! 

A few weeks ago, I cleaned up the office space upstairs!  Whew! Not as hard as I thought it'd be because I have lots of cabinets and drawers, so I could just chuck stuff in them.  No, really, I did throw things away, which I needed to do, but it's a place where I could just put things away because there is a place for them, but this corner of my kitchen, doesn't have that.  So, in my attempt to clean it up and get organized I needed some items that would assist me because I finally came to terms with the reality that the office space upstairs isn't going to suddenly get the use it so deserves and the cave isn't going to be that "drop all" place either.

I had been eyeing up this wall organizer from Potterybarn FOREVER! In my dreams it was just the thing that was going to magically clean up this messy corner and make my ulcer go away! 


So, this January, when all my "things to do this year" starting getting done, I said, "That's it, I'm getting this wall organizer, I don't care what it costs!"  So, I went onto PB.com and priced it out!  $250!!!!!  Yes, $250!  You heard me, $250!  Okay, let's be honest, I wasn't EVER going to spend $250 on this.  I don't care how much money I had!  Nope, nada, hell to the no!  I wasn't doing it.  For a wall organizer?  I'd rather buy a new pair of boots, bedding, or make a car payment for that matter. But a wall organizer?  I don't think so! 

So, the most logical thing to do was to make my own.  Of course, that made sense!  So, here's my tutorial and the break down of the cost! 

First I took a good look at the Potterybarn wall organizer to see what I actually needed.  I didn't need everything, but a few of the essentials.  A corkboard, a hanging wall file, key hangers, a dry erase calendar, and a memory board. 


I found this specific hanging wall file at Home Goods for $9.99, which by the way, was extremely hard to find.  It didn't have hangers on it, so I added my own. I drilled four holes in the hanging wall file.

Here is the label of the hooks or what would be key hangers, that I found at  IKEA.  They came (4) in a pack, and if you read my curtain post, you know that they don't sell things that have holes for screws with the screws.  And they didn't for these hooks either.  Luckily I have an arsinal of screws in my tool box and I had just the right size. 


For the memory board, take an old frame no longer being used.  You know you have one of those laying around somewhere!  Look deep in the closet.  You can use any size that suits your wall space.
Now cut a piece of cardboard to fit inside of the frame.  You will need to cut it just slightly smaller than an exact fit because once you wrap material around it, the material will take up some space.  I used some canvas material I had.  Then staple the canvas to the bach of cardboard like this.


I had some elastic left from other projects and I used this to lay across my memory board, but you can use ribbon too.  I made one of these for my daughter's nursery a few years ago and used shabby chic fabric and a soft pink velvet ribbon.  But for this, I decided on elastic because the elastic will give it good hold if you pull it tight enough before stapling to the back, like in the photo.


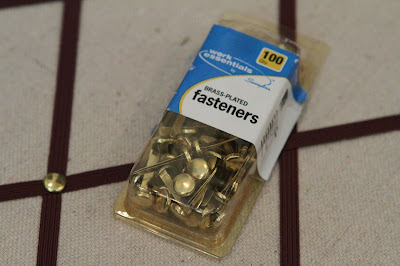
Now you need to add your fasteners.  These I had left over from the one I did for my daughter.  But you can find these in an office supply store. 


You might want to pre-measure where your holes will go and put a hole in the cardboard before hand, but I just added my elastic and stapled it and then took a scissor and at the points that met, I just took a scissor and pushed it through just enough. 


The elastic, the material, and the cardboard were all easy to cut through.  I didn't make a large hole but just enough to put the fastener in and then pushed through and close in the back like so.   

Now put your cardboard in the frame and add your hanging device too.  Then staple the carboard to the back of the frame.  You see from the photo here. 

Here is the completed memory board.  It's not perfect, as you can see, but I made it with things I already had, so essentially, it didn't cost me anything.  I had spent the money on all of the supplies, so to decide how much it cost to make could be a challenge.  Let's just say it was my time that cost money! 


Here's the dry erase calendar that I purchased at Office Depot.  Any size you need to fill your space. 
Cost - $15


Here are the corkboards that I purchased.  $14.99 for (4) 12x12 squares.  These you just used sticky pads that come in the package.  They supply them unlike IKEA with screws!  For my space I only used two, leaving 2 for another room - maybe the cave perhaps???


To hang everything I used this method that my friend told me about.  She found it on Pinterest, and I found it too. Here's the link Roost-home.blogspot.com, but I'll also explain how I did it.  It's the best way to hang things nice and straight. 

First I laid everything out on the carpet to get it to look the way I wanted it to.

Take wax paper and lay it on the floor, overlapping in order to get the right width of your items to be hung.  Then tape it together to hold.  Now lay your items on the wax paper in the order and place you want them.  Trace around the items.  If there is a nail, trace a place for where that would be on the wall. 


Here I hung the wax paper on the wall and taped it in the place I wanted it. 


 Then I placed the items in their places.  For the cork tiles, and the calendar I actually went underneath the wax paper and lined them up with the traced lines and pressed in place.  

Both the cork tiles and the calendar both had adhesive stickies on the back so I just pressed them to the wall. Then you need to figure out where your nail will go for the items that need hanging and mark it on the wax paper and hammer the nail in the wall right through the wax paper.  Then just pull down your wax paper and with the nails still in the wall, hang your hanging items. 

And wa la, you're done!!!!


Now all I need to do is sort through that crap in the corner of the kitchen and start relying on this new space!!!  The kitchen is just around the corner, so it shoudn't be too hard, but I just need to find a moment to commit to it!  Now here's the challenge! : ) 
Total cost:  $45 not including the materials I already had!  I'd say I saved about $200!  Now that's a deal!


Pin It

Wednesday, February 1, 2012

Curtains make a difference


I give credit to anyone who hangs curtains. It's a challenging job, which is why I think most people don't do it. But what I've found is curtains can really finish a room.  I love this look.  Long curtains that puddle at the floor is so dramatic to me. Wouldn't you agree that finding the right ones and spending the money on them is
always the challenge?  


In my experience so far, I've found that IKEA has a good selection at a great price.  Usually you can buy two panels for the price of one.  And who doesn't love that deal, right?  And the the best thing about it, is you can usually always get the look you're trying to achieve in that store, even if it takes you a day to understand the photo instructions and two days to put it together. UGH!

In my master bedroom, I have 5 windows.  One wall is mostly all windows.  Sure, I have blinds on them to keep out the peepers, but the curtains give the room an extra special touch that blinds don't.  And they keep out a little extra sun when you're trying desperately to sleep in on a Saturday or Sunday - even when that 18 month old won't let you.

We've lived in our house 2 years now, and just a couple of weeks ago I finally just hemmed the curtains in my room.  I had originally used that iron on tape to hem them, but don't let them fool you and think you don't need to sew them. YOU DO!  Everytime I closed the curtains at night, the tape began to peel.  So, I had to take them down, and hem those suckers.  But honestly, I actually like them better and feel my room is a little more complete than before because I don't have to look at the tape peeling anymore.

Here's my bedroom before


And here's the after!


By hemming my bedroom curtains, I was inspired to get some for my living room.  Again, at IKEA. I was feeling really blah about that room and was even considering putting slipcovers on my furniture to change the room up, but instead, I opted to put up some curtains.  My furniture is chenille fabric, therefore, I chose to go with a velvet curtain.  Here's a closer look at the material. 


  Here's my living room before


And the after!
 Look at this difference.  I love the look! 

I'm still on the fence about removing the blinds on the french doors because they are taking a beating from my kids, and I don't love the look of them, but the curtains are really to add an accent, not for privacy, so I will probably keep them.

Cost for the living room - 2 velvet panels for $49.
And an extra long curtain rod - $9.99
Two round ends because I wanted a different look for my living room - under $5
The rings for hanging - these I got at Bed Bath and Beyond, because I didn't get them at IKEA, but you can.  2 packs @ $7.99/pack + (2) 20% off coupons. (you can get a pack of 10 at IKEA for $2.99)
Black screws from the hardware store, because either IKEA is a little on the cheap side and doesn't want to include them with the rods, or because they think you don't need them.  $2.00

Total cost for my living room - $80.00 (this is a lot less than slipcovers - either making them or buying them!)
Total cost for my bedroom - not sure, it was 2 years ago.  I am known for keeping a lot of crap, but I definitely didn't keep the receipt for that.

Either way, if you love the look of the good stuff like at Potterybarn or Ballard Designs - go to IKEA first and see how you can get the look on a dime, not a dollar!

Now get out that ladder and hang some curtains! 
Pin It